
Overview of the Market Hub Manager admin area
Configuring market hub settings
To manage market hub settings, click Market Hub in the sidebar and then the Edit link that appears when hovering over market name.


The Status tab contains a single switch that enables or disables the market hub. This should not be touched unless you've agreed with FarmDrop L3C (Headquarters) that you are turning off your market for certain period time or for an emergency situation.
The Market Hub Agenda is the first thing you want to edit. This tab allows you to select times and days for the hub's weekly order cycle. The times set for Open Day & Time and Close Day & Time will show up in your front end under Market Info and Schedule for customers to reference, and also trigger automatic email reminders to customers.
>> The Products Due and Products Available are just for your reference. To set your Pickup window details go to next tab > Pickup Sites

The Pickup Sites tab is where you can define one or more pickup locations, and enable or disable each using the Status option. The locations defined here (if enabled) will be available for customers to choose at checkout.

If your market hub offers Delivery, you can enable delivery and set delivery parameters on the Delivery Settings tab.

The Delivery Rates tab allows you to define delivery rates for different zip codes. The appropriate rate will automatically be added to the customer's total at checkout based on whether they have selected the delivery option and the zip code they provide.
This is also where you will be able to assign a Delivery Driver to a certain zip code or multiple zip codes to a Delivery Driver. Zip codes that don't have a delivery driver assigned will transfer the delivery fee to the connected Market Hub Manager Stripe account. See article on adding Delivery Drivers >> https://help.farmdrop.us/article/112-adding-delivery-drivers

The Customization tab for emails allows the market hub manager to customize the content of three automated email notifications triggered by Market Agenda and Pickup Sites settings:

The Customization tab for banners provides the ability to customize the banner that appears on the shop page during Open, Close and when the market is temporarily Disabled or still has not launched yet. Also weekly specials and delivery options can be marketed here.


Once the market hub has been open for a week, you will need to go in and download your order sheets.
Download Order reports
The Download Order Reports section allows you to do just that.

There are four types of reports available to download: a customer order report, an aggregate order report, a customer email report, and a market sales report.
 After selecting the report type, set the time range for the report by clicking the From and To fields in turn and selecting a date.
The customer order report contains all customer orders, with line items, separated out by the customer. This report is a pack list for you to fulfill orders on pickup day, and will get attached to customers' goods at pickup to ensure the right customer gets the right bag.
The aggregate order report is a summary of items purchased separated out by the vendor. This can be used to check producers bulk drop offs, before you start packing orders and realize something has gone wrong.
The customer email report can be used as a checklist of what customer orders have been filled, or picked up, and to communicate with customers if something goes wrong with their order ahead of pickup, or if they forget to pickup.
The market sales report provides an overview of sales activity and includes gross revenue, market hub manager earnings, FarmDrop earnings, vendor earnings, and Stripe fees, among other data.
Any report can be downloaded as a PDF or CSV file. A CSV file can be opened with any spreadsheet application. For the most part, the PDF format is most appropriate for the customer and aggregate order reports to be printed for weekly distribution days. The CSV format is most appropriate for the customer orders to have on your laptop during order packing to help search for products that are leftover to help clarify who ordered them. Also, for the customer email report to have on hand close to your email server for communications.
Managing vendors
The "manage vendors" section provides an overview of vendors associated with the market hub.

The status toggle allows the market hub manager to enable or disable a vendor. Disabled vendors do not show up in the list of vendors on the front end of the site and their products do not display on the shop page. However, customers can still access these vendors' products if they already have links to them in their browser history or bookmarks. Also, search engines may have indexed these links. Consequently, products offered by a disabled vendor can still be purchased. If a vendor wants their products to be completely unavailable for purchase, please contact FarmDrop support to this effect.
The Stripe column indicates whether or not a vendor has connected their Stripe account. If a vendor has not connected their Stripe account through their vendor dashboard, they will not be able to sell in the market hub.
Hovering over a vendor reveals two links: View and Switch To.

The View link simply points to the vendor's store on the front end of the site. The Switch To link allows the market hub manager to simulate the vendor's login without having to enter their password. This is extremely useful for troubleshooting, and also for you if you are also a vendor, it makes sense to manage both from the market hub manager side. After switching to a vendor's login, you can switch back to your own by clicking the "Switch Back" link at the very bottom of the page, just under the footer.

Keep in mind that any changes made while switched to a vendor account are real changes performed as the vendor you're switched to.
Managing orders
The WooCommerce section shows all orders placed within the market hub.
 Orders can be filtered by date or customer using the filtering fields at the top of the list.

Orders can also be filtered using a key word search.
 Multiple orders can be selected using the checkbox to the left of the order numbers and bulk actions performed on them. The Apply button must be clicked to finalize the selected action.

Clicking the "Show Sub-Orders" link next to an order shows the suborders for that order, each of which is the portion of the order from a specific vendor.

The suborders for all orders can be revealed by clicking the Toggle Sub-orders button at the top of the list.

The pager allows you to page through orders. If you'd like to see more orders per page, click Screen Options in the upper right and increase the number in the "Number of items" per page field.


Clicking any order or suborder shows its details. The Order Notes sidebar often contains information helpful for troubleshooting.

Managing products
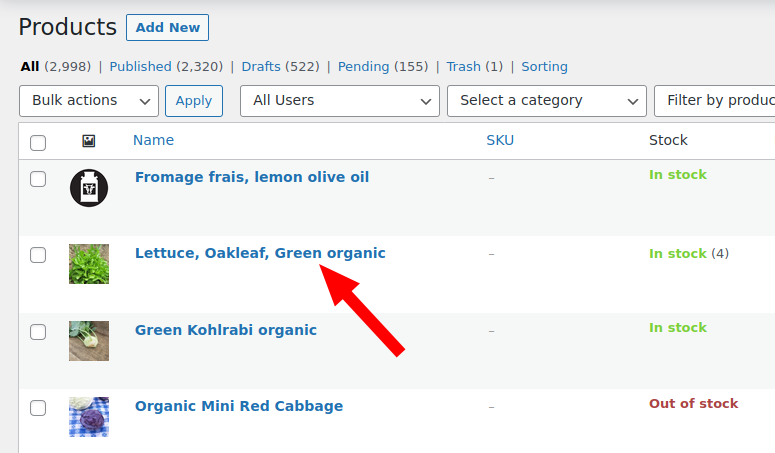
Clicking the Products tab in the sidebar reveals a list of all products sold in the market hub, regardless of their status.

The list can be filtered by user, category, product type, or stock status. Click the Filter button after defining one or more of these filters.

Products can also be searched by key word.
 As with orders, multiple products can be selected and acted on in bulk. After selecting the relevant orders, select the Edit option in the Bulk Actions selector and then click Apply to see options for modifying products in bulk.
 After setting the appropriate options, click Update at the bottom of the options area to apply the changes. All selected products will be updated.

Click a product's title to open its editing screen, where any product attributes can be changed.
 Managing coupons >> CORRECTION, select Percentage Discount not Fixed Cart Discount due to a Code change from Dokan.

 Managing coupons >> CORRECTION, select Percentage Discount not Fixed Cart Discount due to a Code change from Dokan.
The Marketing section of the admin area is where coupons can be added, removed, and managed. Click the Marketing link in the admin sidebar to see a list of coupons. Click the Add Coupon button at the top to create a new coupon. Click any of the coupons in the list to change the settings for an existing coupon.

Be sure to select the appropriate market hub in the Market Hub field.It is advisable to test any coupons you create to make sure they are applying to orders correctly. As long as no one has the coupon code that you create, there is no danger of others using the coupon before it is ready. It's best to test the coupons under your customer login, which you can do by logging in using a different browser so that you can keep your admin login active. It is not necessary to check out to test coupons.
